Dream Home Roofers
1-855-610-9720
Get Free Estimate 1-855-610-9720
Free Estimate 1-855-610-9720
  • About us
    • Reviews
    • Careers
    • Financing
    • Blogs
  • Services
    • Roofing
      • Replacement
      • Inspection
    • Gutters
      • Gutter Protection
  • Service Area
    • Turnersville, NJ
    • West Caldwell, NJ
    • King of Prussia, PA
    • Laurel, MD
    • Fairfax, VA
  • Current Specials
  • Contact Us
  • Menu Menu
Act Now for 50% OFF Materials. Click here for details.

Tag Archive for: roof

How to Measure a Roof from the Ground

June 17, 2024/in Roofing/by Dream Home Roofers

Measuring your roof can seem like a daunting task, especially if you’re not too keen on heights. Fortunately, you don’t always need to climb up to get an accurate measurement. Here’s a handy guide on how to measure a roof from the ground. It is always best to have a trained professional handle the task for you, in order to get an accurate and precise measurement. Dream Home Roofers are here to help you take on this task.

Step 1: Gather Your Tools

Before you start, you’ll need a few tools:

  • Tape Measure: A long one, preferably 100 feet or more.
  • Laser Measuring Tool: Optional, but highly useful for longer distances.
  • Notepad and Pen: To jot down your measurements.
  • Calculator: To perform area calculations.

Step 2: Measure the Perimeter

Start by measuring the length and width of your house at ground level. Use the tape measure or laser tool to get accurate measurements of each side. Write down these numbers carefully.

Step 3: Calculate the Roof Pitch

The pitch or slope of your roof is essential for accurate measurements. You can estimate this by measuring from the ground. Here’s a simple method:

  • Place a level on the ground beside your house, aligning one end with the base of the wall.
  • Measure the vertical distance from the other end of the level to the ground.
  • Divide this height by the level’s length to get the pitch ratio. For example, if the level is 12 inches long and the height is 6 inches, the pitch is 6/12 or 0.5.

Step 4: Determine the Roof Area

With the perimeter and pitch, you can estimate the roof area:

  1. Calculate the ground-level area: Multiply the length by the width.
  2. Adjust for pitch: Multiply the ground-level area by a factor based on the pitch. Common factors are:
    • Flat (0 pitch): Multiply by 1
    • Low (4/12 pitch): Multiply by 1.054
    • Medium (9/12 pitch): Multiply by 1.25
    • Steep (12/12 pitch): Multiply by 1.414

Step 5: Consider Roof Features

Don’t forget to account for any dormers, valleys, or other features that may affect the total area. These can complicate the measurement, making it more challenging to estimate accurately from the ground.

Why Professional Measurement is Crucial

While these steps can give you a rough idea, nothing beats a professional measurement for accuracy. Professionals like the team at Dream Home have the experience, tools, and knowledge to provide precise measurements, ensuring you get the right amount of materials for your project.

Contact Dream Home for Accurate Roof Measurements

Measuring a roof is no small task, and errors can lead to costly mistakes. If you want to ensure your measurements are spot-on, reach out to the professionals at Dream Home today. We’ll can take precise measurements, saving you time and effort. Contact us online today to schedule your roof measurement, or if you’re still wondering how to measure a roof from the ground.

0 0 Dream Home Roofers https://dreamhomeroofers.com/wp-content/uploads/2024/09/dhr-logo.png Dream Home Roofers2024-06-17 19:25:482024-06-17 19:25:48How to Measure a Roof from the Ground
Roof Vent

How to Install a Roof Vent

June 12, 2024/in Roof Installation/by Dream Home Roofers

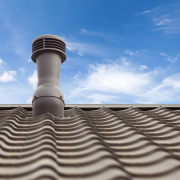
Installing a roof vent is a crucial step in maintaining the health of your home. Proper ventilation helps regulate temperature, prevent moisture buildup, and extend the lifespan of your roof. While the idea of DIY can be tempting, sometimes it’s best to leave it to the pros. Here’s a step-by-step guide on how to install a roof vent, and why contacting Dream Home might be your best bet for a hassle-free experience.

Step-by-Step Guide to Installing a Roof Vent

Tools and Materials Needed

  • Roof vent
  • Measuring tape
  • Pencil or marker
  • Utility knife
  • Reciprocating saw or jigsaw
  • Roofing nails and hammer
  • Roofing cement
  • Safety gear (gloves, safety glasses, and a harness if working on a steep roof)

1. Identify the Location

Choose the optimal spot for your vent. It should be as close to the ridge as possible to maximize airflow. Mark the location with your pencil or marker.

2. Cut the Opening

Using your utility knife, cut away the shingles around your marked area. Then, carefully cut a hole in the roof deck with your saw. Make sure the hole matches the size of your vent.

3. Install the Vent

Place the vent over the hole, ensuring it fits snugly. Nail it into place, securing it firmly to the roof. Apply roofing cement around the edges to seal it and prevent leaks.

4. Replace the Shingles

Cut shingles to fit around the vent. Secure them with roofing nails and apply more roofing cement to seal any gaps.

5. Inspect Your Work

Check for any gaps or potential leaks. Ensure the vent is secure and that the surrounding shingles are properly replaced.

Why Choose the Roofing Experts at Dream Home?

While installing a roof vent might seem straightforward, it’s a task that requires precision and expertise. One small mistake can lead to leaks, structural damage, and costly repairs. The pros at Dream Home have years of experience and the know-how to get the job done right the first time. Working on a roof can be dangerous, especially if you’re not used to it, and our professionals are trained in safety protocols and equipped with the right gear to handle the job without risk. We use top-quality materials that are built to last and can recommend the best vent for your specific roof type and climate, ensuring optimal performance. From initial inspection to final installation, our experts provide comprehensive services you can depend on.

Reach Out to Dream Home Roofers Today

Installing a roof vent is an important task that can greatly impact your home’s comfort and longevity. While the DIY route is an option, the expertise, safety, and efficiency offered by our pros at Dream Home make it a smart choice for many homeowners. Save yourself from the hassles and potential risks. Contact us online today and let our pros handle the task for you, or if you’re still wondering how to install a roof vent.

https://dreamhomeroofers.com/wp-content/uploads/2024/06/how-to-install-a-roof-vent-blog-image.jpg 720 1280 Dream Home Roofers https://dreamhomeroofers.com/wp-content/uploads/2024/09/dhr-logo.png Dream Home Roofers2024-06-12 23:07:302024-06-12 23:07:30How to Install a Roof Vent

How to Install Roll Roofing

May 1, 2024/in Roof Replacement/by Dream Home Roofers

Roll roofing is an excellent choice for small or low-pitch roofing projects or as a temporary roofing solution. It’s a quick and cost-effective way to protect your shed, garage, or low-slope roof. With the right tools and a bit of know-how, installing roll roofing can be a straightforward DIY project. In this guide, we’ll walk you through the process of how to install roll roofing step by step. For a traditional asphalt roof installation in the Delaware Valley and surrounding areas, Dream Home Roofers can help.

Gather Your Roll Roofing Materials and Tools

Before you begin, make sure you have all the necessary materials and tools:

  • Roll roofing material
  • Roofing nails
  • Roofing cement
  • Utility knife
  • Hammer
  • Tape measure
  • Chalk line
  • Roofing adhesive (if needed)
  • Roofing primer (if recommended by the manufacturer)

Steps to Installing Roll Roofing

1. Prepare the Roofing Surface

Ensure that the surface you’ll be applying the roll roofing to is clean, dry, and smooth. Remove any debris, dirt, or old roofing material. If necessary, repair any damaged areas and apply a primer as recommended by the manufacturer.

2. Measure and Cut the Roll Roofing

Measure the length of the roof and add a few extra inches for overhang on each side. Roll out the roofing material on a flat surface and use a tape measure and chalk line to mark the desired length. Use a utility knife to cut the roll to size.

3. Apply Adhesive if the Material Requires

Some roll roofing materials require the application of roofing adhesive to ensure proper adhesion to the surface. Follow the manufacturer’s instructions for applying the adhesive evenly to the backside of the roll roofing material.

4. Position and Secure the Roll Roofing

Carefully lift the roll roofing onto the roof, ensuring it’s positioned correctly with an equal overhang on all sides. Use roofing nails to secure the roofing material in place along the edges and at regular intervals across the surface. Be sure to drive the nails flush with the surface to prevent water from seeping underneath.

5. Seal the Seams and Edges

Apply roofing cement along the seams and edges of the roll roofing to create a watertight seal. Use a putty knife or trowel to spread the cement evenly and ensure all seams are fully covered.

6. Finish the Installation

Once the roll roofing is securely in place and all seams are sealed, trim any excess material from the edges using a utility knife. Inspect the entire roof to ensure there are no loose edges or areas that may need additional sealing.

Contact a Skilled Roofer if You Need Help

By following these steps, you can successfully install roll roofing on your shed, garage, or low-slope roof. Remember to always prioritize safety when working on your roof, and if you’re unsure about any step of the process, don’t hesitate to seek professional assistance. If you find that your roof might be better suited for asphalt shingle roofing or if you prefer a professional touch, consider reaching out to Dream Home Roofers for a quote. Their expertise can ensure your roof gets the attention it deserves, providing reliable protection for years to come.

0 0 Dream Home Roofers https://dreamhomeroofers.com/wp-content/uploads/2024/09/dhr-logo.png Dream Home Roofers2024-05-01 18:32:472025-01-03 20:40:17How to Install Roll Roofing

How to Shingle a Gambrel Roof

March 1, 2024/in Roof Replacement/by Dream Home Roofers

Understanding How to Shingle a Gambrel Roof

Are you considering shingling a gambrel roof? Gambrel roofs, with their distinctive double-sloped design, have a sense of traditional charm and elegance. However, the unique shape of a gambrel roof can present a challenge when it comes to shingling. With the right knowledge and guidance, it is possible to tackle this project yourself and achieve stunning results, however, it is best to let a roofing professional such as Dream Home complete the task correctly and put your mind at ease.

Understanding Gambrel Roofs

Before diving into the process of how to shingle a gambrel roof, it’s essential to grasp the fundamentals of a gambrel roof. Unlike conventional roofs with single slopes, gambrel roofs feature two slopes on each side. The lower slope is steeper than the upper slope, creating a distinctive barn-like appearance. This design maximizes interior space, making gambrel roofs popular for both residential and commercial buildings.

Preparing for the Project

Preparation is key to a successful shingling project. Here’s what you’ll need:

  1. Materials: Gather high-quality asphalt roofing shingles, roofing felt, nails, flashing, and other necessary supplies.
  2. Safety Gear: Invest in safety gear such as gloves, goggles, and sturdy footwear to protect yourself during the project.
  3. Tools: Equip yourself with essential tools like a hammer, roofing nails, utility knife, ladder, and chalk line.

Steps to Shingle a Gambrel Roof

Now, let’s walk through the steps to shingle your gambrel roof:

  1. Prepare the Surface: Ensure the roof deck is clean, dry, and free of debris. Install roofing felt as an underlayment, starting from the bottom and working your way up.
  2. Install Starter Shingles: Begin at the eaves and install starter shingles along the lower edge of the roof. These provide a secure base for the first row of shingles and help prevent water penetration.
  3. Lay the Shingles: Working from the bottom up, lay the first row of shingles along the eaves, following the manufacturer’s instructions for proper alignment and spacing. Use chalk lines to maintain straight rows.
  4. Overlap and Nail: As you work your way up the roof, overlap each row of shingles to ensure proper water runoff. Nail the shingles in place, driving nails just below the tar strip to avoid damaging the shingles.
  5. Cutting Shingles: Use a utility knife to cut shingles as needed to fit around vents, chimneys, and other roof protrusions. Take care to maintain proper alignment and ensure a tight seal.
  6. Install Flashing: Install flashing around roof penetrations and in valleys to prevent water leakage. Secure the flashing in place using roofing cement or nails, ensuring a watertight seal.
  7. Complete Ridge and Hip Lines: Finish the project by installing ridge caps along the ridges and hips of the roof. These specialized shingles provide extra protection and a finished look.

Leave the Job to The Roofing Experts

While shingling a gambrel roof can be a rewarding DIY project, it’s essential to recognize when to call in the experts. Dream Home offers professional roofing services backed by years of experience and expertise. Leave the job to the pros at Dream Home, as we understand the complexities of gambrel roofs and all other architectural styles.

Contact the Gambrel Roof Professionals at Dream Home Today

Learning how to shingle a gambrel roof requires careful planning, precision, and attention to detail. By following the steps outlined above and trusting the experts at Dream Home, you can achieve a beautiful and long-lasting roof that enhances the beauty and functionality of your home. Contact us online today to learn more about our roofing services and how we can help bring your dream roof to life.

0 0 Dream Home Roofers https://dreamhomeroofers.com/wp-content/uploads/2024/09/dhr-logo.png Dream Home Roofers2024-03-01 22:56:282025-01-01 19:24:19How to Shingle a Gambrel Roof
Roof leak around chimney

How to Fix a Roof Leak Around a Chimney

February 27, 2024/in Roof Repair/by Dream Home Roofers

Fixing a Roof Leak Around a Chimney

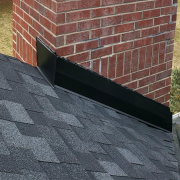
Repairing a roof leak around a chimney demands immediate attention to prevent further damage. If water is coming in near your chimney, inadequate chimney flashing could be the cause. While a DIY solution might suffice, it is best to contact roofing experts for this issue. To address chimney flashing issues, follow these steps outlined for how to fix a roof leak around a chimney. Dream Home Roofers always recommends that you hire a licensed roofer so that you and your home remain safe.

Tools & Materials Needed to Fix Your Roof

Ensure your extension ladder extends at least 3 feet past the roof edge for safety. Opt for polyurethane flashing sealant for its ability to expand and contract with temperature changes. If your roof has a steep pitch, employ a roof safety harness for protection.

  • Extension ladder
  • Roof safety harness
  • Work gloves
  • Wire brush
  • Chisel
  • Hammer drill
  • Masonry screws
  • Caulking gun
  • Polyurethane flashing sealant
  • Utility knife
  • Garden hose

Step by Step Instructions to Fix the Leak:

  1. Position the extension ladder securely and ascend to the roof.
  2. Examine the chimney flashing, ensuring no debris obstructs your view. Thoroughly check all edges for gaps allowing water ingress.
  3. Eliminate any loose or deteriorated sealant using a chisel and wire brush.
  4. Apply fresh flashing sealant along all flashing edges. Modify the tube tip with a utility knife to produce a 1/4-inch sealant bead.
  5. If any flashing is loose, apply sealant beneath the loose sections.
  6. Use a hammer drill to affix additional masonry screws to secure loose flashing.
  7. Seal exposed screw heads with sealant.
  8. Once the sealant sets, test the repair by running water around the chimney with a garden hose for 5 minutes.
  9. If leakage persists, search for overlooked gaps and apply additional sealant.

Consider Professional Roof Inspection

If you find that the flashing is absent altogether or if the leak stubbornly persists despite your best efforts, it may be time to turn to the expertise of a professional roofing contractor. Dream Home Roofers, known for our excellence in asphalt roof replacements, is here to offer tailored solutions to address all your roofing concerns. With our extensive experience and commitment to quality craftsmanship, we specialize in providing top-notch services that ensure the longevity and structural integrity of your home. Don’t let unresolved roofing issues compromise your comfort and security. Contact us today for a roofing estimate you can trust.

https://dreamhomeroofers.com/wp-content/uploads/2024/02/how-to-fix-a-roof-leak-around-a-chimney-blog-image.jpg 720 1280 Dream Home Roofers https://dreamhomeroofers.com/wp-content/uploads/2024/09/dhr-logo.png Dream Home Roofers2024-02-27 00:17:362025-01-03 20:36:14How to Fix a Roof Leak Around a Chimney

What is the Cost to Replace a Roof?

October 18, 2023/in Roof Replacement/by Dream Home Roofers

How Much Does Roof Replacement Cost?

“What is the cost to replace a roof?”, is a concern for any homeowner considering roof replacement, and if you’re a new homeowner who’s never been through this process before, you may have no idea what to expect. There are eight core factors that can play a role in how much it costs to replace your roof:

  • Labor
  • Repairs
  • Tear-off
  • Materials
  • Ventilation
  • Roof features
  • Square footage
  • Permits and fee

• Square Footage & Unique Characteristics

The overall size of your home is the number one factor in answering “What is the cost to replace a roof?”. The bigger your roof, the more materials and labor required. This is why you will often see reroofing prices discussed on a per square basis. A square is equal to 100 square feet. You should also note that if your roof has additional complexities, such as dormers or particularly steep or low pitches, then there may be additional costs for those beyond the usual dollars per square.

• Labor & Materials

The cost of materials and labor determine how much you pay per square. Costs are regional, and material prices can be affected by market conditions. This is why the usual advice is to schedule at least three estimates. That provides you context for what labor and materials cost and helps you to spot low and high bids. Note also that labor costs can be seasonal. You may, for instance, be able to save money by scheduling your roof replacement during a non-peak time of the year.

• Tear-Off & Repairs

The tear-off—or removal of the old roof—is generally a routine task that will be included in the labor estimate, but there are scenarios in which you will have to pay more. An example is a previous owner opting to install a second layer of asphalt shingles over a first rather than remove them. Repairs can increase costs as well. If there was a leak, for instance, that damaged the sheathing, that will cost extra.

• Ventilation

Roof ventilation is an important system that helps ensure a long life for your roof. Replacement of ridge vents and the like is generally included. Replacing turbines and box ventilation will usually require an additional cost. There will also be additional costs if your roof ventilation needs to be upgraded.

• Permits & Fees

As of 2018 in New Jersey, permit and permit scheduling fees no longer factor into the question of “What is the cost to replace a roof?”. Roof replacement for one- and two-family dwellings is now considered minor work and ordinary maintenance. If you’re reading this from outside New Jersey, you’ll need to check the websites for your state and local government to determine what permit fees if any you should be paying.

Schedule a Roof Estimate in South Jersey

There are many factors determining the answer to “What is the cost to replace a roof?”, and the best way to get an answer that is meaningful to you is to schedule estimates. Most reputable roofing companies provide free estimates, and if your home is in Voorhees or elsewhere throughout South Jersey, Dream Home Roofers will be glad to provide you with an on-site consultation at no cost and without obligation. We’re a local company with many years of experience and encourage you to contact us today to schedule an appointment or with any questions about the roofing systems we install.

https://dreamhomeroofers.com/wp-content/uploads/2024/09/dhr-logo.png 0 0 Dream Home Roofers https://dreamhomeroofers.com/wp-content/uploads/2024/09/dhr-logo.png Dream Home Roofers2023-10-18 19:31:372024-12-19 23:51:07What is the Cost to Replace a Roof?
Page 4 of 41234

Pages

  • About us
  • Blogs
  • Careers
  • Contact Us
  • Current Specials at Dream Home Roofers
  • Feedbacks
  • Financing
  • Gutter Guards in the Delaware Valley
  • Gutters in Delaware Valley
  • Home
  • No Office Location
  • Privacy Policy
  • Rate
  • Reliable Roof Repair Services in Allentown, PA
  • Reliable Roof Repair Services in Atlantic City, NJ
  • Reliable Roof Repair Services in Bethesda, MD
  • Reliable Roof Repair Services in Bethlehem, PA
  • Reliable Roof Repair Services in Blairstown, NJ
  • Reliable Roof Repair Services in Boonsboro, MD
  • Reliable Roof Repair Services in Bowie, MD
  • Reliable Roof Repair Services in Burlington, NJ
  • Reliable Roof Repair Services in Camden, NJ
  • Reliable Roof Repair Services in Cherry Hill, NJ
  • Reliable Roof Repair Services in Chester, PA
  • Reliable Roof Repair Services in Clifton, NJ
  • Reliable Roof Repair Services in Columbia, MD
  • Reliable Roof Repair Services in Dundalk, MD
  • Reliable Roof Repair Services in Egg Harbor, NJ
  • Reliable Roof Repair Services in Ellicott City, MD
  • Reliable Roof Repair Services in Elm, PA
  • Reliable Roof Repair Services in Frankford, NJ
  • Reliable Roof Repair Services in Freehold, NJ
  • Reliable Roof Repair Services in Gaithersburg, MD
  • Reliable Roof Repair Services in Germantown, MD
  • Reliable Roof Repair Services in Glen Burnie, MD
  • Reliable Roof Repair Services in Gloucester Township, NJ
  • Reliable Roof Repair Services in Hamilton, NJ
  • Reliable Roof Repair Services in Harrisburg, PA
  • Reliable Roof Repair Services in Lancaster, PA
  • Reliable Roof Repair Services in Laurel, MD
  • Reliable Roof Repair Services in Lebanon, PA
  • Reliable Roof Repair Services in Levittown, PA
  • Reliable Roof Repair Services in Mahwah, NJ
  • Reliable Roof Repair Services in Monroe, NJ
  • Reliable Roof Repair Services in Mount Laurel, NJ
  • Reliable Roof Repair Services in Norristown, PA
  • Reliable Roof Repair Services in Philadelphia, PA
  • Reliable Roof Repair Services in Potomac, MD
  • Reliable Roof Repair Services in Reading, PA
  • Reliable Roof Repair Services in Rockville, MD
  • Reliable Roof Repair Services in Severn, MD
  • Reliable Roof Repair Services in Silver Spring, MD
  • Reliable Roof Repair Services in Smithsburg, MD
  • Reliable Roof Repair Services in Somerset, NJ
  • Reliable Roof Repair Services in Tinton Falls, NJ
  • Reliable Roof Repair Services in Towson, MD
  • Reliable Roof Repair Services in Union, NJ
  • Reliable Roof Repair Services in Vineland, NJ
  • Reliable Roof Repair Services in Voorhees, NJ
  • Reliable Roof Repair Services in Waldorf, MD
  • Reliable Roof Repair Services in Washington Township, NJ
  • Reliable Roof Repair Services in Weston, PA
  • Review Feedback Form
  • Reviews
  • Roof Inspection in Delaware Valley
  • Roof Inspection in Turnersville, NJ
  • Roof Inspection in West Caldwell, NJ
  • Roof Inspections in Laurel, MD
  • Roof Repair
  • Roof Repair in Cherry Hill, NJ
  • Roof Repair in Columbia, MD
  • Roof Repair in Delaware Valley
  • Roof Repair in Harrisburg, PA
  • Roof Repair in Lancaster, PA
  • Roof Repair in Philadelphia, PA
  • Roof Repair in Turnersville, NJ
  • Roof Repair in Vineland, NJ
  • Roof Repair in West Caldwell, NJ
  • Roof Repair Services in Bethlehem, King of Prussia, PA
  • Roof Repair Services in King of Prussia, PA
  • Roof Repair Services in Norristown, King of Prussia, PA
  • Roof Replacement in Cherry Hill, NJ
  • Roof Replacement in Columbia, MD
  • Roof Replacement in Delaware Valley
  • Roof Replacement in Harrisburg, PA
  • Roof Replacement in King of Prussia, PA
  • Roof Replacement in Lancaster, PA
  • Roof Replacement in Laurel, MD
  • Roof Replacement in Philadelphia, PA
  • Roof Replacement in Turnersville, NJ
  • Roof Replacement in Vineland, NJ
  • Roof Replacement in West Caldwell, NJ
  • Roofing Company in Fairfax, VA
  • Roofing Company in King of Prussia, PA
  • Roofing Company in Laurel, MD
  • Roofing Company in Maryland
  • Roofing Company in New Jersey
  • Roofing Company in Pennsylvania
  • Roofing Company in Turnersville, NJ
  • Roofing Company in West Caldwell, NJ
  • Roofing in Allentown, PA
  • Roofing in Atlantic City, NJ
  • Roofing in Bethesda, MD
  • Roofing in Bethlehem, PA
  • Roofing in Blairstown, NJ
  • Roofing in Boonsboro, MD
  • Roofing in Bowie, MD
  • Roofing in Burlington, NJ
  • Roofing in Camden, NJ
  • Roofing in Cherry Hill, NJ
  • Roofing in Chester, PA
  • Roofing in Clifton, NJ
  • Roofing in Columbia, MD
  • Roofing in Delaware Valley
  • Roofing in Delaware Valley
  • Roofing in Delaware Valley
  • Roofing in Dundalk, MD
  • Roofing in Egg Harbor, NJ
  • Roofing in Ellicott City, MD
  • Roofing in Elm, PA
  • Roofing in Fairfax, VA
  • Roofing in Frankford, NJ
  • Roofing in Freehold, NJ
  • Roofing in Gaithersburg, MD
  • Roofing in Germantown, MD
  • Roofing in Glen Burnie, MD
  • Roofing in Gloucester Township, NJ
  • Roofing in Hamilton, NJ
  • Roofing in Harrisburg, PA
  • Roofing in King of Prussia, PA
  • Roofing in King Of Prussia, PA
  • Roofing in Lancaster, PA
  • Roofing in Laurel, MD
  • Roofing in Laurel, MD
  • Roofing in Lebanon, PA
  • Roofing in Lehigh Valley
  • Roofing in Levittown, PA
  • Roofing in Mahwah, NJ
  • Roofing in Maryland
  • Roofing in Monroe, NJ
  • Roofing in Mount Laurel, NJ
  • Roofing in New Jersey
  • Roofing in Norristown, PA
  • Roofing in Pennsylvania
  • Roofing in Philadelphia, PA
  • Roofing in Potomac, MD
  • Roofing in Reading, PA
  • Roofing in Rockville, MD
  • Roofing in Severn, MD
  • Roofing in Silver Spring, MD
  • Roofing in Smithsburg, MD
  • Roofing in Somerset, NJ
  • Roofing in South Jersey
  • Roofing in Tinton Falls, NJ
  • Roofing in Towson, MD
  • Roofing in Turnersville NJ
  • Roofing in Turnersville, NJ
  • Roofing in Union, NJ
  • Roofing in Vineland, NJ
  • Roofing in Voorhees, NJ
  • Roofing in Waldorf, MD
  • Roofing in Washington Township, NJ
  • Roofing in West Caldwell, NJ
  • Roofing in West Caldwell, NJ
  • Roofing in Weston, PA
  • Service Area
  • Services
  • Template About Our Team
  • Template All Brands Logos
  • Template All Brands Logos New
  • Template Blogs
  • Template Certification
  • Template Financing Banner
  • Template Gutter Brands
  • Template our Process
  • Template Our Work
  • Template Project Block
  • Template Review Banner
  • Template Review Banner (King of Prussia, PA)
  • Template Review Banner (Laurel, MD)
  • Template Review Banner (Turnersville, NJ)
  • Template Review Banner (West Caldwell, NJ)
  • Template Roofing Brands
  • Template Service Blocks (All)
  • Template Service Blocks (King of Prussia, PA)
  • Template Service Blocks (Laurel, MD)
  • Template Service Blocks (Turnersville, NJ)
  • Template Service Blocks (West Caldwell, NJ)

Categories

  • Blog
  • Roof Installation
  • Roof Repair
  • Roof Replacement
  • Roofing
  • Uncategorized

Archive

  • July 2025
  • June 2025
  • May 2025
  • March 2025
  • February 2025
  • January 2025
  • December 2024
  • November 2024
  • October 2024
  • August 2024
  • July 2024
  • June 2024
  • May 2024
  • April 2024
  • March 2024
  • February 2024
  • November 2023
  • October 2023
  • July 202

Our Office Locations

Map icon 501 NJ‑168, Turnersville, NJ 08012

Map icon 175 Fairfield Ave, Suite 2B, West Caldwell, NJ 07006

Map icon 144 E. Dekalb Pike, Suite 200, King of Prussia, PA 19406

Map icon 8920 Stephens Rd, #104, Laurel, MD 20723

Map icon 4085 Chain Bridge Rd, Suite 302, Fairfax, VA 22030

NJ Lic. #13VH11352200 | PA Lic. #PA161658 | MD Lic. #157465 | DE HIC# 2025-000012170 | VA HIC# 2705196076

Privacy Policy | Service Area

Follow Us

Check out our social pages and let us know how we’re doing See the latest from Dream Home Roofers and let us know what we can do for you.

BBB Accredited

BBB Accredited

Local Roofing Contractors
Financing
Careers
Contact

© 2025 Dream Home Roofers Roofing Contractor Marketing Provided by Robben Media

Scroll to top